Summary
The Print Label Wizard guides staff through the process of producing spine labels for library materials from scanning copy barcodes through to printing the pages of spine labels with the applicable details in the format required. Access to the Print Label Wizard is available from the Cataloging Home screen, from the Function menu in the Copies Search, List, and Detail screens, and from the Print Spine Labels button on the Recently Smart Cataloged banner.
This guide will provide an explanation of how to use the Print Label Wizard process to produce a report ready to print on a page of spine labels.
The wizard comprises four steps:
- Scanning a set of barcodes. Duplicate barcodes remain while unmatched barcodes are not. The maximum number of barcodes that can be entered is determined by the number entered in Parameter 1200, Maximum List Size
- The list of matched barcodes and copy details will display, each with a corresponding checkbox. By default, all barcodes will be printed as each checkbox includes a check. Labels can be prevented from being printed by clicking in the corresponding checkbox to remove the check
- Selecting the applicable report. Label skipping is available for all spine label reports
- Running the report by clicking on the report link.
A Next button is provided in each screen that, when clicked, moves the User to the next screen where the next step of the process is to be completed while a Back button enables the User to return to the previous screen if required.
Access Print Labels Wizard
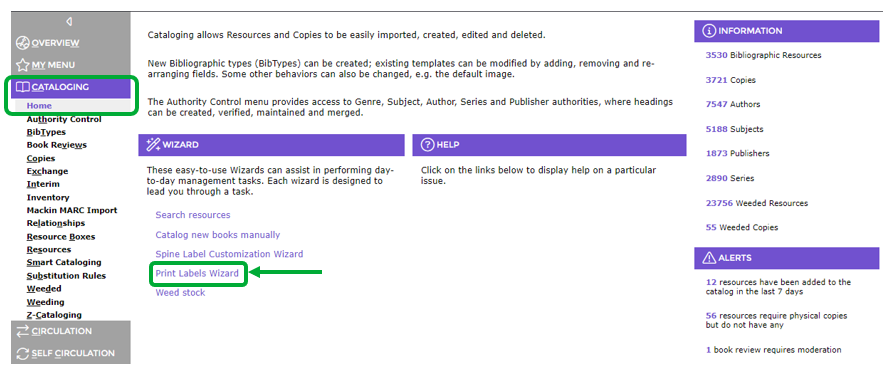
The Print Labels Wizard link is in the Wizard box on the Cataloging Home screen.
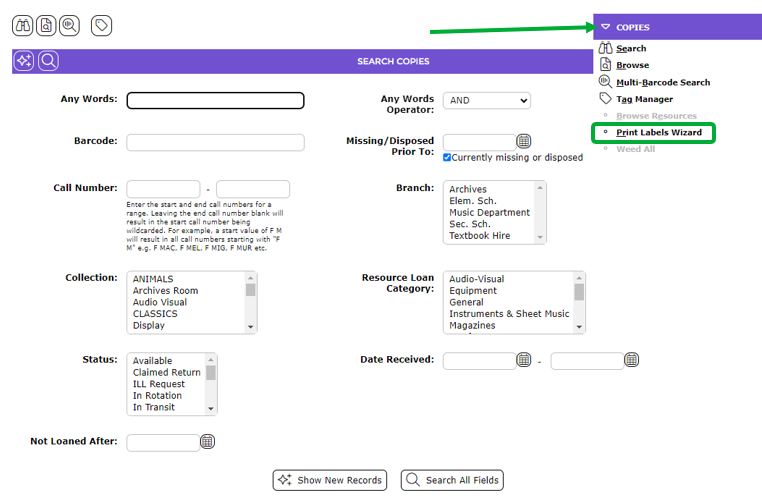
The wizard can also be selected from the Function menu on the Copies Search, List and Detail screens, or type the shortcut of pr.
It is also accessible from Smart Cataloging after records have been added:

Complete the Print Label Wizard Process
1. Scan in the applicable barcodes. If entering the barcodes manually hit the Enter key on your keyboard after each one. If you have recently cataloged new items, a link will appear to automatically list the newly added barcodes.
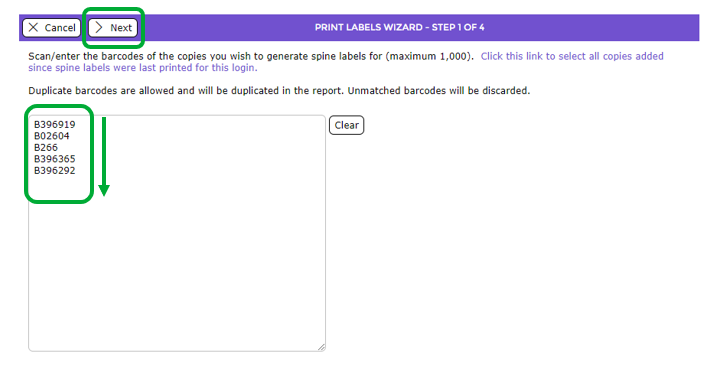
2. When all the barcodes have been entered, click the Next icon. The Print Labels Wizard – Step 2 of 4 screen will display.
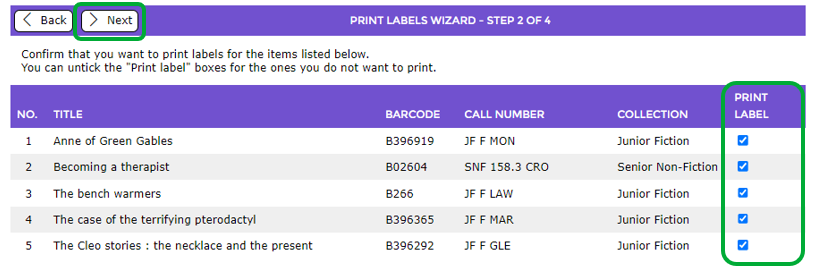
3. The screen will include the Title, Barcode, Call Number, Collection (if available), and a corresponding checkbox for all the barcodes scanned or entered in the previous screen.
4. By default, all checkboxes include a check indicating each copy will have a label printed.
5. If there is one or more copies, for which a label is not to be printed, click in the corresponding checkbox to remove the check.
6. Click on the Next icon and the Print Labels Wizard – Step 3 of 4 screen will display.
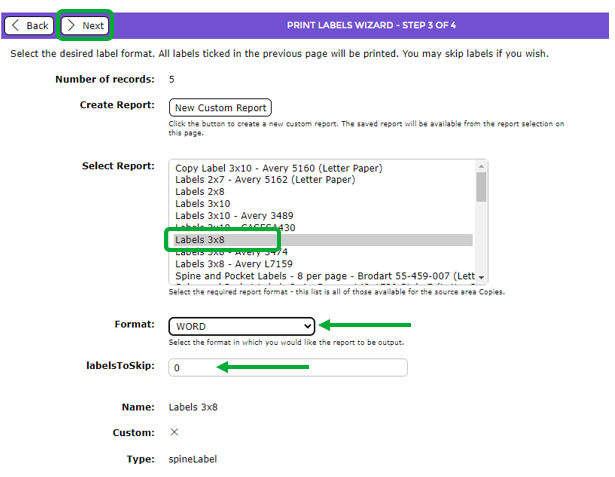
7. Click on the required report in the Select Report list-box.
Note: Report formats not used can be hidden, if required. For more information, including step-by-step instructions, please refer to How to hide unused reports.
8. Select the applicable format from the Format field’s drop-down list, for example PDF or WORD.
9. If there are labels to be skipped, enter the number in the Labels to Skip field.
10. Click on the Next icon. The Print Labels Wizard – Step 4 of 4 screen will display.

11. Click the link to Download [your label’s name] Report.
12. Click the Back icon to return to the report selection screen if you wish to print another set of labels. Or;
13. Click the Finish icon to return to the Cataloging > Home screen. A browser popup message will appear. Click OK to return to the Cataloging > Home screen. Or;
14. Click the Return to Cataloging icon to return to the start page for the most recently used Cataloging method:
- Smart Cataloging will return to the Smart Cataloging page
- Z-Cataloging will return to the Z-Cataloging Search page
- Manual cataloging will return to the ‘Add New Resource’ popup window
Was this article helpful?
That’s Great!
Thank you for your feedback
Sorry! We couldn't be helpful
Thank you for your feedback
Feedback sent
We appreciate your effort and will try to fix the article