Summary
The Item Label Designer enables library staff to create a label report designed to conform to the required dimensions and preferred label data format. The Units options are used for all measurements on the screen such as label height and width, gutters and margins. More than one customized label report can be created using the designer if required.
This guide will provide the steps to completing the customization of a label report using the designer.
Customize a Label Report
The process to complete the label designer is the same irrespective of the location from where the Users access it.
- Click on the Item Label Designer link in the Wizard panel on the Cataloging Home screen or via Reporting > Item Label Designer.
- The Item Label Designer screen will display.
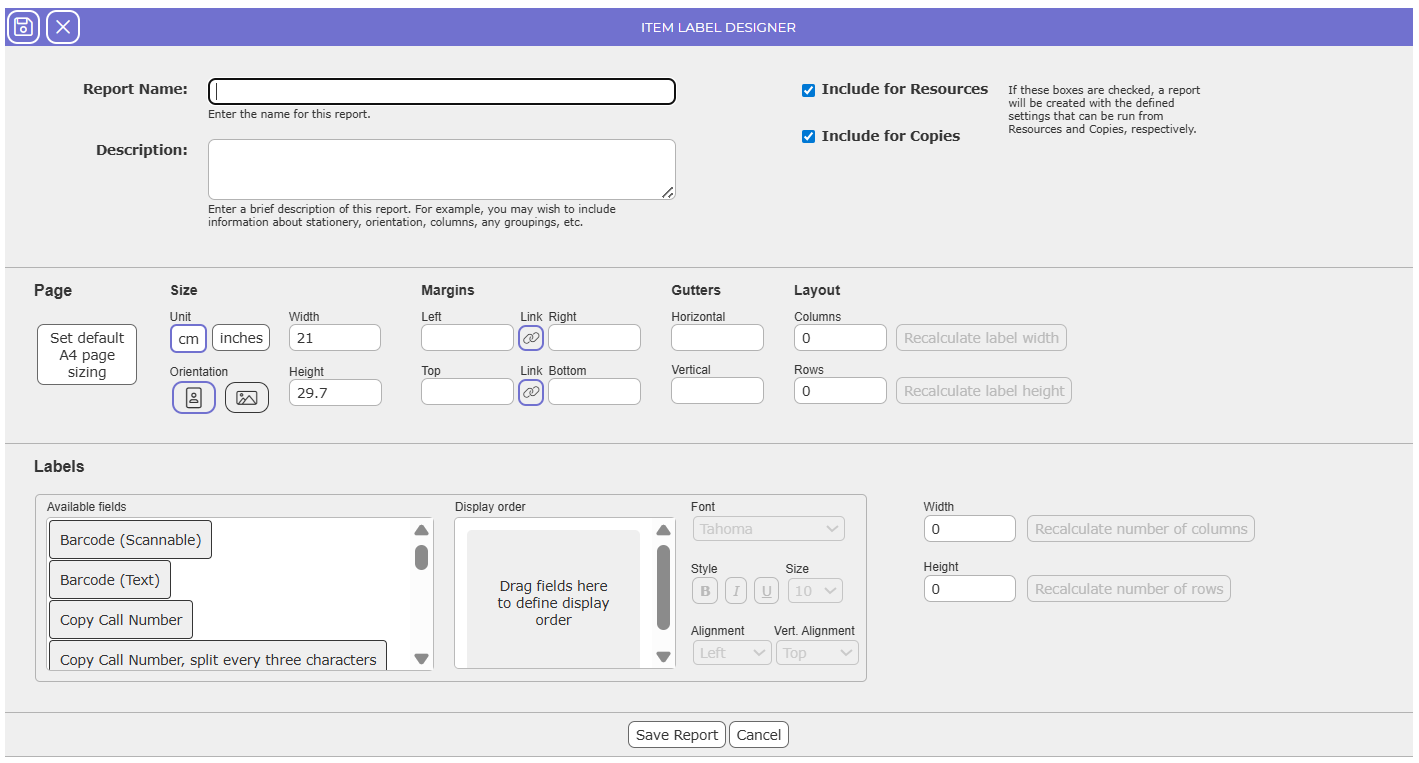
- Complete all relevant fields. Note that any field initially disabled, will automatically activate (for example the Font fields depend on the field which is dragged into the Display order field.)
The following table provides the name of each field and a brief description of the type of setting or value that can be chosen:
Field | Description |
Report Name | Enter a unique name for the report in this field. A warning message will display if the name entered is not unique or if the name contains invalid characters:
|
Description | Enter a brief description of this report in this field. It could include information about stationery, orientation, columns, any groupings, etc. |
Include for Resource | Click in this checkbox (to display a check) if the report is to be created with defined settings that can be run from the Reports screen when accessed via Cataloging > Resources. |
Include for Copies | Click in this checkbox (to display a check) if the report is to be created with the defined settings that can be run from the Reports screen when accessed via Cataloging >Copies. |
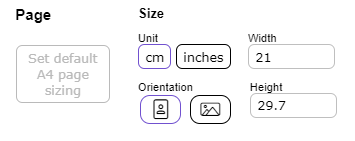
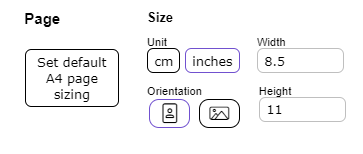
Page: Size: Unit | There are two buttons available - cm (use for A4 size paper) and inches (use for Letter paper). Click either of the buttons followed by the Set default A4 page sizing button. The values in the Width and Height fields will be set according to the chosen option.
The default values, relating to the pre-selected button, will automatically display in the Width and Height fields. In the example below the values of 21, and 29.7 respectively, display if the cm button was chosen.
If the inches button is subsequently clicked the User will need to click the Set default A4 page sizing button to clear the centimeter values in the Page Width and Page Height fields and display the default inches values, 8.5 and 11.
|
Page: Size: Width | This field is automatically populated with the value applicable to the Unit button selected. The default value can be changed if required.
|
Page: Size: Height | This field is automatically populated with the value applicable to the Unit button selected. The default value can be changed if required.
|
Page: Size: Orientation | There are two buttons: portrait These allow the User to choose one of these orientations for the labels in the printer. The effect of choosing one of these buttons is twofold:
|
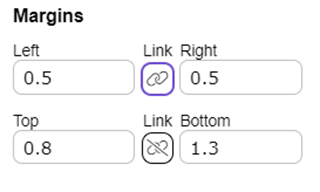
Margins | The margins around the outside of the labels can be specified. If different values are required for the Top, Bottom, Left and Right margins, deselect both Link buttons, and enter the values in each of the four fields.
However, if for example, the Left and Right margins are identical, ensure the Link button is selected and then enter a value in one of the fields. Also, if for example, the Top and Bottom margins are different, ensure the Link button is deselected and then enter different values in both fields
|
Gutters: Horizontal | Enter the space to be set between each label horizontally if applicable. |
Gutters: Vertical | Enter the space to be set between each label vertically if applicable.
|
Number of Columns | If the page of labels contains a specific, number of rows, for example 7, enter that value in this field. The value entered here will determine what value is automatically entered in the Label Width field.
When a value is entered in this field, the Recalculate label width button will activate. The User will need to click the button is any change is made to the value in this field.
|
Number of Rows | If the page labels contain a specific number of rows, for example 7, enter that value in this field. The value entered here will determine what value is automatically entered in the Label Height field.
When a value is entered in this field, the Recalculate label height button will activate. The User will need to click the button if any change is made to the value in this field.
|
Labels |
Each label report is a unique combination of selections from Available fields options, displayed in the required order in the Display order field. Each field can also be a different font style (font face, bold/italic/underline, font size) and Alignment and Vertical Alignment. |
Labels: Width | If the Number of Columns field is not completed and you wish to enter a specific height value, enter that value in this field.
When a value is entered in this field, the Recalculate number of columns button will activate. The User will need to click the button is any change is made to the value in this field.
|
Labels: Height | If the Number of Rows field is not completed and the User wishes to enter a specific value enter that value in this field.
When a value is entered in this field, the Recalculate number of rows button will activate. Click the button if any change is to be made to the value in this field.
|
Available Fields | Options are:
If including any of the User Text fields, the selected fields will need to be included on the Copy Add and Edit screens in Cataloging > Resources and Cataloging > Copies. The names of the User Text fields can be adjusted using System > Translations, e.g. User Text 1 -> Series Call Number (e.g. HP 1 for book 1 in the Harry Potter Series). |
Display Order | Fields from the Available fields list are dragged into this field. They can be re-ordered by dragging within the selected list.
|
Font | When a field is selected in the Display order, the font type, size style and alignment of that field can be individually chosen.
The font type can be chosen from a drop-down list, e.g. Arial or Verdana. Buttons for Bold, Italics and Underline are available to Style the text. The font size can be chosen from a drop-down list. The Alignment field allows the content of the field to be aligned Left, Center or Right of the row on the label. The Vert. Alignment field allows the content of the field to be positioned at the Top, Middle or Bottom of the row on the label. |

 and landscape

- When all the required details have been completed click the Save Report button.
- The Report Details screen will display.
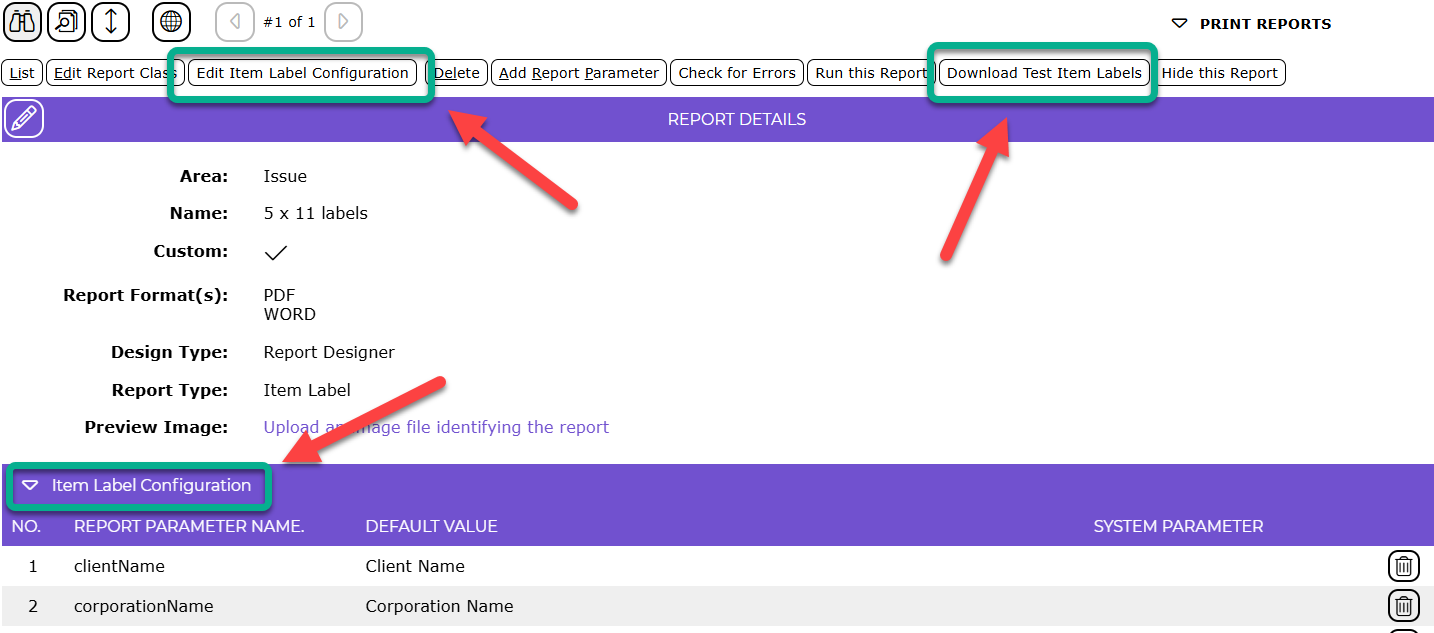
Check and Edit Options for the Spine Label Report’s Configuration
To check the configuration settings, entered whilst creating the new report via the Item Label Designer:
- Click on the Item Label Configuration link
- The configuration details will display.
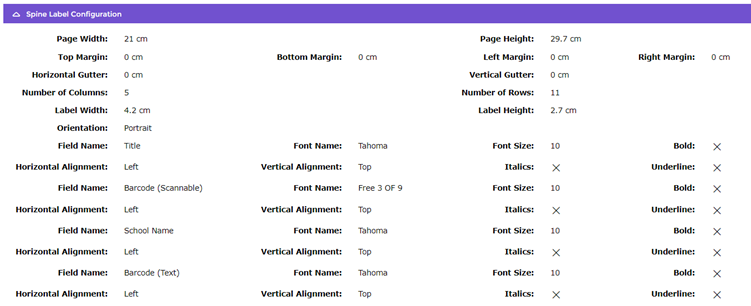
- If any changes need to be made click on the Edit Item Label Configuration button at the top of the screen. Note that all of the page settings are visible, along with all of the settings for each field used for the report.
- The Print Reports > Edit screen will display enabling the User to change any settings in the applicable fields.
Validation for label sizes and numbers applies to the feature. If the User enters a value which would result in too many labels for the size of the label sheet (A4 or Letter), or labels which are too large to fit, the following message will display under any applicable field when the Save button is clicked, “Your current configuration cannot fit this many labels of the entered size. The maximum number of labels that can be entered is x.”
The value in any applicable field must then be edited.
- Once all edits are completed click the Save button to return to the Print Reports screen.
- The report can be deleted by clicking the Delete button.
- Once the configuration has been confirmed, it is possible to create a trial output using some sample copies from your MackinVision system. Click the Download Test Item Labels button.
- The report will now be available for selection in the Reports screen via the Resource and Copies List and Detail screen when the Generate report icon is clicked. They are available from both areas because, in the example provided above, the checkbox next to both Include for Resources and Include for Copies was clicked in (see the table) to display a check.
Was this article helpful?
That’s Great!
Thank you for your feedback
Sorry! We couldn't be helpful
Thank you for your feedback
Feedback sent
We appreciate your effort and will try to fix the article