Summary
The Terminate Checkouts option of the Circulation Desk allows you to return some or all of a Patron’s Checkouts without needing to scan the barcode of each item. This makes it easy to process lost items.
Terminate Checkouts allows you to:
- Returncheckouts in bulk and then optionally:
- Choose a Status other than ‘Available’ to apply if the item has been lost, for example, ‘Missing’ or ‘Lost’
- Enter a Status Reason to explain the loss, which defaults to ‘Lost by <patron name> on <date>’
- Transfer the checkouts to another Patron
- Return and then Weed the items.
These options provide a comprehensive toolkit for processing lost items.
This guide will describe three different ways that Terminate Checkouts might be used by your library to process lost items:
- Checkouts have been lost, damaged beyond repair, or destroyed:
Action: Terminate Checkouts > ReturnStatus = ‘Disposed’
Status message = Lost by <patron> on <date>.
Result: The Copies are returned and given a Status of Lost with an explanation.
OR
Action: Terminate Checkouts > Weed
Result: The Copies are returned and then Weeded.
- Checkouts have not been returned but might still be found:
Action: Terminate Checkouts > ReturnStatus = ‘Missing’
Status message = Last loaned to <user>.
Result: The Copies are returned and given a Status of Missing with an explanation
- The Patron has left but another family member is still a library member:
Action: Terminate Checkouts > Transfer to another family member.
Result: The Checkouts are Returned from the original Patron and added to the other Patron’s Checkouts as new Checkouts with the Date Due calculated from the Lending Rules.
Each of these scenarios is described in detail below.
Overview of Terminate Checkouts
The steps for Terminating Checkouts that are the same for all options are described here then each of the three Terminate option is described in the following sections.
- Navigate to the Circulation Desk
 .
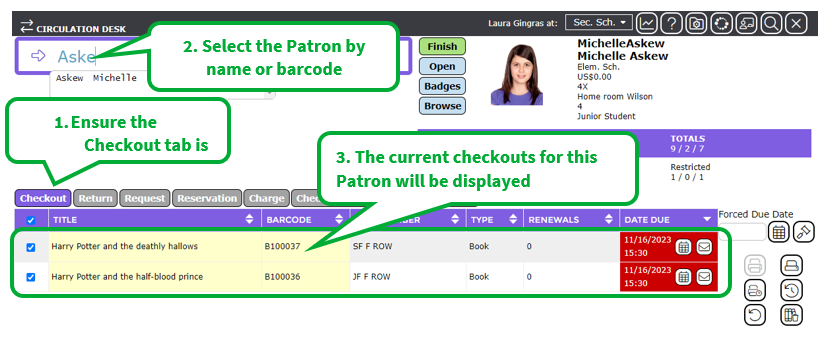
. - Ensure the Checkout tab is selected and then select the required Patron by name or barcode. The Patron’s current checkouts will be displayed.
3. Select which Checkouts should NOT be Terminated by unticking their check boxes.

Note: Initially all boxes are ticked since the most common case is that all Checkouts will be terminated. If any Checkout should NOT be terminated, remove its checkmark.
Note: The check box at the top of the column can be used to check or uncheck all checkboxes at once. If you only want to terminate a small number of Checkouts, it can be faster to uncheck all check boxes and then check the checkboxes for the one or two Checkouts that will be Terminated.
4. Click Terminate Checkouts.
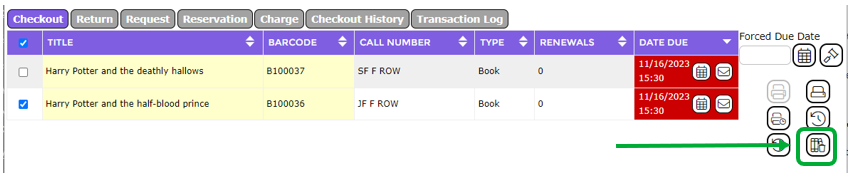
5. Select the appropriate Terminate Checkouts option from the scenarios below.
Checkouts have been lost, damaged beyond repair or destroyed
When there is no possibility that a Checkout will ever be returned, the appropriate action will be determined by your library policy.
Some Libraries will:
- Return the Checkout to remove it from the Patron’s current Checkouts
- Change the Copy Status to ‘Lost’ and record the details in Status Reason
Alternatively, other libraries will:
- Return the Checkout to remove it from the Patron’s current Checkouts
- Weed the Copy
Terminate checkouts allows either option.
- After selecting the checkouts to be terminated click the Terminate Checkouts icon. The TERMINATE CHECKOUTS pop up window will be displayed.
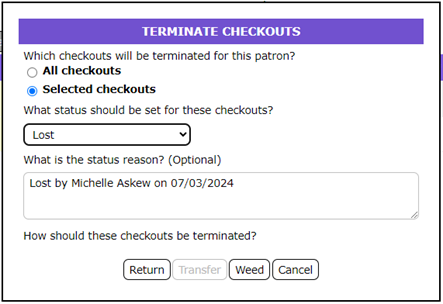
2. Change the Status to be applied to each Terminated Checkout from ‘Handle as usual’ to ‘Lost’.
3. The Status Reason will be filled in automatically with the text ‘Lost by <Patron name> on <today’s date>’, for example, ‘Lost by Michelle Askew on 07/03/2024’.
Note: You can edit the Status Reason if you want to change the wording. Although the Status Reason is optional, it is recommended that it be used. Status Reason is a searchable field, and you can search to find the items lost by a particular Patron.
4. Click the  button if your library policy is to change the Status of lost checkouts but not to Weed them.
OR
Click the  button if your library policy is to Weed lost checkouts and remove them from the catalog.
Note: If Weed is selected, the checkouts will be Returned and then you will be prompted to Weed the Copies and the Resources (if the last or only Copy was weeded).
Refer to the guide ‘How to Weed (Delete) copies in bulk’ for more details.
Checkouts have not been returned but might still be found
When a checkout has not been returned, but there is a still a possibility that it might be returned, many libraries will change the Status of the Copy to ‘Missing’.
- After selecting the checkouts to be terminated click the Terminate Checkouts icon. The TERMINATE CHECKOUTS pop up window will be displayed.
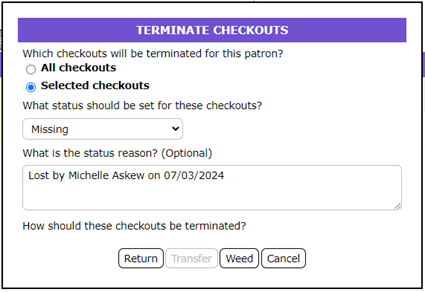
2. Change the Status to be applied to each Terminated Checkout from ‘Handle as usual’ to ‘Missing’.
3. The Status Reason will be filled in automatically with the text ‘Lost by <Patron name> on <today’s date>’, for example, ‘Lost by Michelle Askew on 07/03/2024’.
Note: You can edit the Status Reason if you want to change the wording. Although the Status Reason is optional, it is recommended that it be used. Status Reason is a searchable field, and you can search to find the items lost by a particular Patron.
4. Click the  button to:
- Return the checkouts and remove them from the Patron’s current checkouts
- Change the Status of the lost checkouts to ‘Missing’.
- Enter the Status Reason supplied
- Enter the current date as the Missing/Disposed Date.
5. The Items that were checked out will remain in the Catalog and will NOT be Weeded.
The Patron has left but another family member is still a library member
When a Patron has left your school, but a younger sibling is still enrolled, you may choose to Transfer the checkouts to the sibling.
A similar situation may occur when a staff member leaves, and their library checkouts are to be transferred to the person replacing them.
Both cases can be processed using the Transfer option of Terminate Checkouts.
- After selecting the checkouts to be terminated click the Terminate Checkouts icon. The TERMINATE CHECKOUTS pop up window will be displayed.
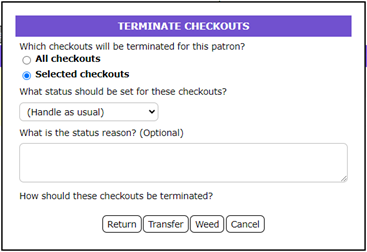
2. Click the  button. The TERMINATE CHECKOUTS: TRANSFER: SELECT PATRON window will be displayed.
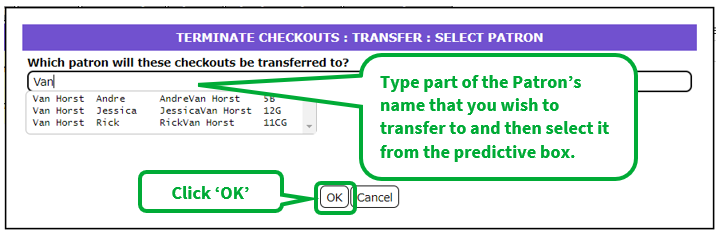
3. Select the Patron to whom these checkouts will be transferred, then click the  button.
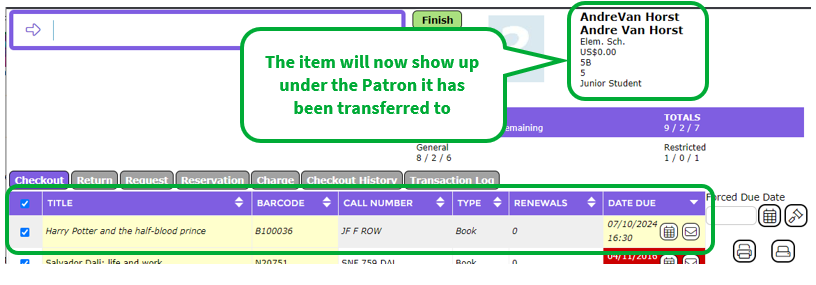
4. The checkouts will be Returned from the original Patron and issued as new Checkouts to the selected Patron. The Date Due will be calculated based on the Lending Rules.
Was this article helpful?
That’s Great!
Thank you for your feedback
Sorry! We couldn't be helpful
Thank you for your feedback
Feedback sent
We appreciate your effort and will try to fix the article