Summary
HTML emails can be used in conjunction with the other features of Overdue Notices in order to notify students, parents and teachers when a loaned item has become overdue. If you are unfamiliar with Overdue Notices please see the How to Create an Overdue Notice Template guide.
HTML emails will enable you to:
- Add images for the overdue items to the email
- Add a school banner/image to the Overdue email header
- Customize the patron, copy and total fields displayed in each email
How to Enable HTML Emails
In order to enable HTML emails some parameters will first need to be configured.
- Navigate to Management > Parameters
- Type 1603 into the Search box and click the Search button next to this
- You should now see a REPORTING bar with a list of parameters underneath. Click the Edit button on the right of this bar
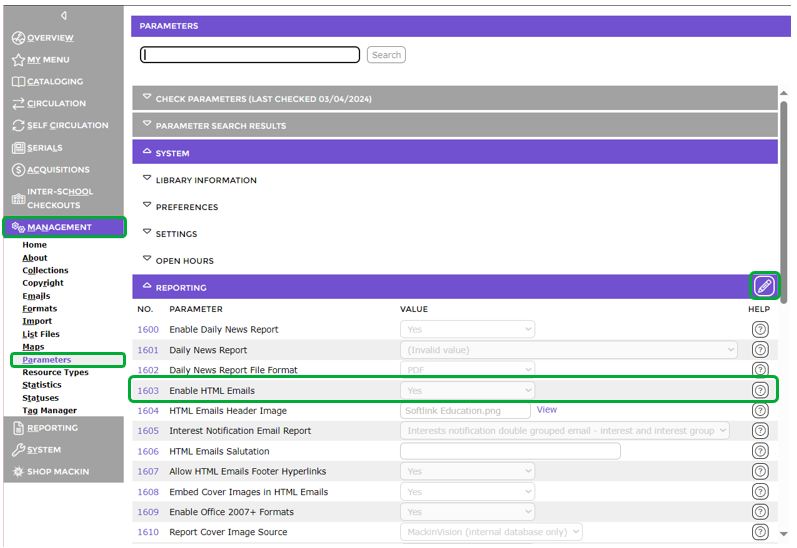
4. Change parameter 1603 to Yes using the drop-down menu then click the save icon on the right of the REPORTING bar.

How to add a Banner to HTML Emails and Enable Cover Images
MackinVision can be configured to add an image/banner in the header of the HTML emails.
Before starting this section please ensure you have an image prepared and ready to upload into MackinVision to be used as the Email Header. For best results, use a rectangular image wider than it is tall, with a width close to or larger than 650 pixels. The uploaded image will be scaled to have a width of 650 pixels for display in emails.
The steps below continue from the previous section “How to Enable HTML Emails”
5. Click the Edit button on the right of the REPORTING bar
6. Click the Choose File button for parameter 1604
7. Find and Upload the image for the Email Header

Note: The red text will appear with a warning that if the image is greater than 650 pixels, it will be scaled to fit within that width. For best imaging, upload following these proportions.
8. If Cover Images are to be included in the HTML emails, set parameter 1608 to Yes, otherwise ensure that the parameter is set to No.
9. Click the save icon on the right of the REPORTING bar 
For examples of HTML email templates with a banner included please see the Overdue Notice Report Formats guide.
How to Customize HTML Email Templates
When using HTML email templates in MackinVision these templates can be customized to add or remove fields and modify the information included on the emails that are sent.
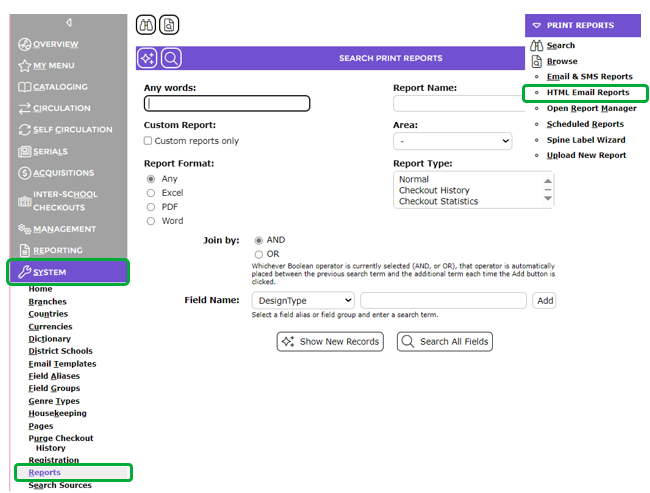
- Navigate to System > Reports
- Select HTML Email Reports from the functions drop-down menu in the top right corner
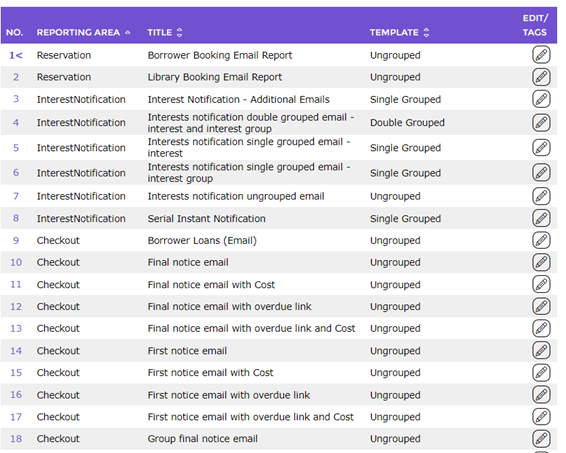
3. Click the edit button on the right for the overdue email template you wish to change. These can be identified by the word Checkout in the Reporting Area field.
4. In the Patron Detail Fields: section select the fields you wish to add by selecting them from the drop-down menu and clicking the + button next to this
5. Remove any fields you don’t want by selecting the field from the list underneath and using the – button next to this.
6. The display order for these fields can be changed by similarly selecting them from the list and using the up and down arrows to change their position
7. If you wish to change the default message/introductory text for this email template, make the changes in the Introductory Text: field
8. If you wish to change the default footer/summary text for this email template, make the changes in the Summary Text: field
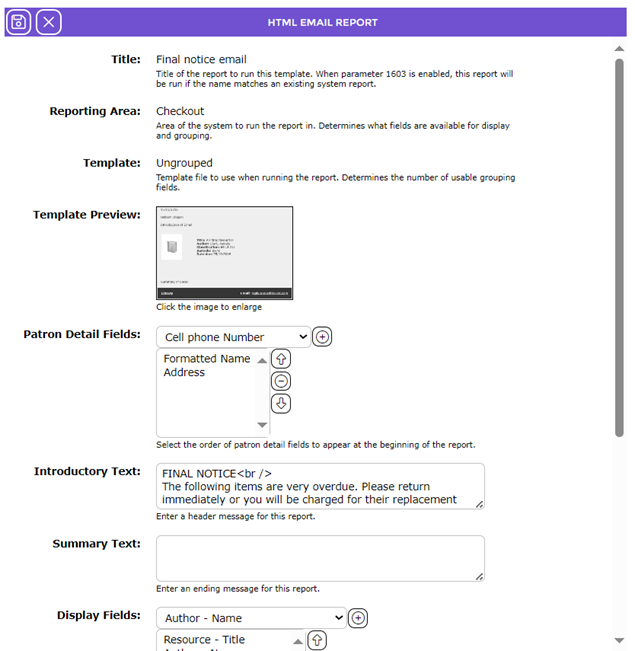
9. Repeat steps 4 -> 6 for the Display Fields: section. This will determine the information displayed for each checkout.
10. Repeat steps 4 -> 6 for the Total Fields: section.
This section will not be included in the Hold or Interest HTML email templates.
11. Click the Save button in the top left corner 
When creating an Overdue Notice there are three available fields to add a Header, Message and Footer. These fields will take precedence over anything entered in the HTML Email Template.
The following fields in the Overdue Notice will overwrite what is written in the following HTML Email Template fields.
- The Report Message: field will replace what is written in the Introductory Text: field
- The Report Footer: field will replace what is written in the Summary Text: field
Adding a Salutation to HTML emails
- Navigate to Management > Parameters
- Type the following number into the Search box then click the Search button
- 1606
- Click the Edit button on the right of the REPORTING bar
- Type the salutation you would like into parameter 1606 e.g. Hello, or Dear,
- Click the save icon on the right of the REPORTING bar
The following is an example of an HTML email with a salutation added.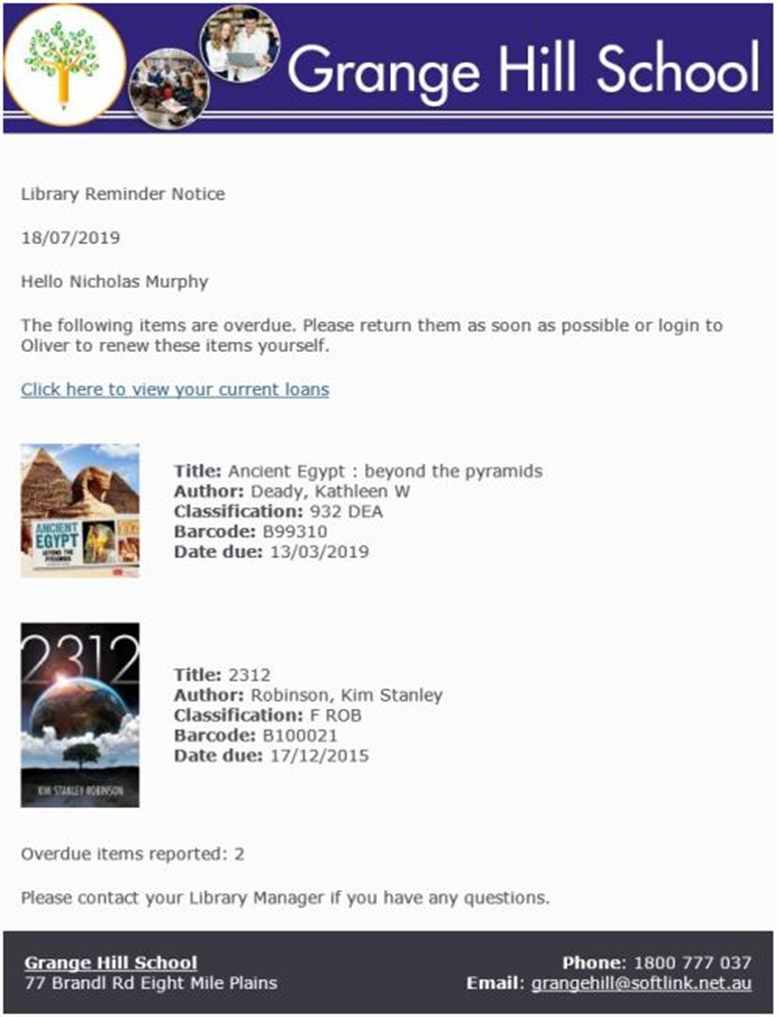
Was this article helpful?
That’s Great!
Thank you for your feedback
Sorry! We couldn't be helpful
Thank you for your feedback
Feedback sent
We appreciate your effort and will try to fix the article