Summary
This guide will describe how to set up MackinVision to email overdue notices to patrons automatically.
Overview
Emailing Overdue Notices is an efficient way to encourage your patrons to return resources that are overdue. MackinVision allows you to set up the emailing of Overdue Notices to happen automatically according to rules.
Using email to send Overdue Notices is faster than printing notices and, once set up, can be completely automated.
Before setting up an automatic email Overdue Notice in MackinVision, there are two factors to be considered:
- Is MackinVision configured to send emails;
- Do all Patrons have an email address entered in their patron record.
Once you have confirmed that MackinVision can send emails and all patrons have an email address, you then need to set up the ‘rules’ to be used for sending the Overdue Notice emails. The ‘rules’ are determined by the settings used in one or more Overdue Notice Templates. The factors here are:
- What format will be used for each of the Overdue Notices;
- How many overdue notices will be sent;
- When should each of the Overdue Notices be sent.
Email Configuration Confirmation
To confirm that MackinVision is configured to send emails:
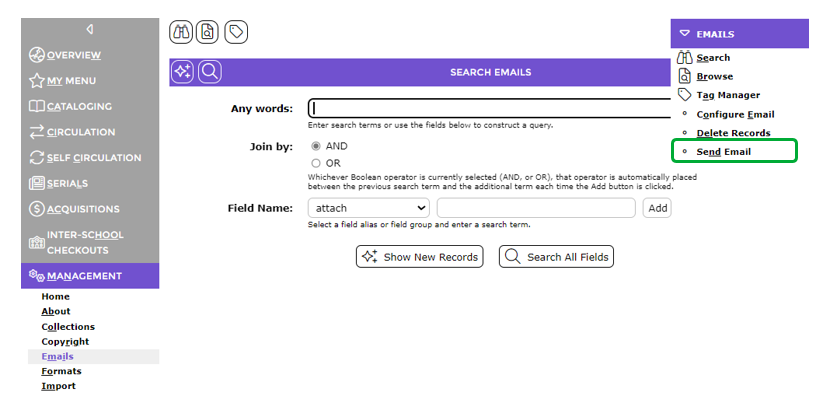
- Navigate to Management > Emails. Select Send Email from the Emails dropdown function menu.
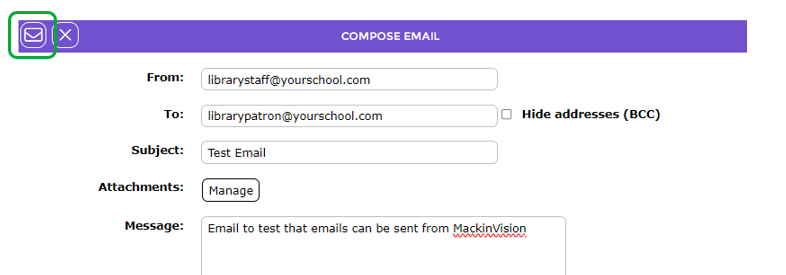
- Fill in the form and use your own email address for both the From and To fields. Click the Send email button to send the email.
- If MackinVision is unable to send the email the following message will be displayed. Check that Parameter 7650 contains a valid address for an email server.

4. If you receive the email, then MackinVision can send emails.
5. If the email does not arrive within a reasonable period of time:
- Check any spam filters to make sure the email has not been intercepted;
- Double check that the To: email address you used is valid;
- Try sending the email to another address.
Do all Patrons have an email address?
MackinVision can only send emails to patrons who have an email address entered in their patron record.
- Navigate to Circulation > Patrons. Search for a patron and view their Patron Detail screen. If an email address has been entered it will be displayed.

2. If you need to enter email addresses for a large number of patrons, performing an import from a csv file containing the Alias and email address is a more efficient method than entering each one manually. Refer to the guide: How to Import a Patron CSV file for details.
What format will be used for each of the Overdue Notices?
Select a suitable option from the list of available Email forms. Most of the forms are available with variations to include:
- Cost
- Overdue link
How many overdue notices will be sent and when should each of the Overdue Notices be sent?
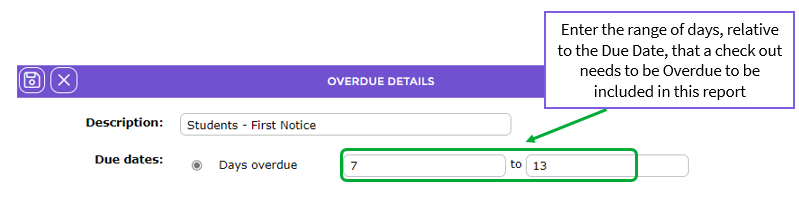
The number of Overdue Notices sent and when they are sent is controlled by the two fields Days Due Back (from) and Days Due Back (To). Together they specify a range of dates relative to the due date during which an item on Checkout will be included in the Overdue Notice.
For example:
Due Date of Checkout: 3 October 2016
Days Due Back (From): 7
Days Due Back (To): 13
The checkout will be included in the Overdue Notice report starting on 10 October 2016, 7 days after the checkout was due, and stopping on 16 October 2016, 13 days after the checkout was due at which time the next Overdue Notice Template will take over.
Note: Overdue Notices sent by email are usually configured so that Repeat is set to One Notice Only. With this setting, each overdue Checkout is only reported once when it first falls within the Days Due Back range.
How to Set Up ‘Rules’ to email Overdue Notices
An Overdue Notice Template allows you to configure all the settings required to automate the sending of Overdue Notices by email. In the following example three Overdue Notice Templates will be created that will send out increasingly strongly worded emails to Students if the item is not returned.
- 7 days overdue. Send a friendly reminder email;
- 14 days overdue. Send a request for immediate return’
- 21 days overdue. Send a final demand email.
Each email will only be sent once as the items become overdue by 7, 14 and 21 days.
The Overdue Notice Template allows you to specify:
- A range for the number of days overdue during which the Notice will be sent, for example, 7 – 14;
- The format of the report that will be used;
- Custom text for the Report Header, Message and Footer;
- Restrictions for which Patrons will be included, for example, Students only;
- Restrictions for which Resources will be included, for example, Textbooks only;
- Whether the notice will be emailed just once or every night until the item is returned.
Field | First Notice | Second Notice | Final Notice |
Days Due Back (From) | 7 | 14 | 21 |
Days Due Back (To) | 13 | 20 | 9999 |
Email Subject | Overdue Library Checkouts – First Notice | Overdue Library Checkouts – First Notice | Overdue Library Checkouts – Final Notice |
Email form | First Notice Email | Second Notice Email | Final Notice Email |
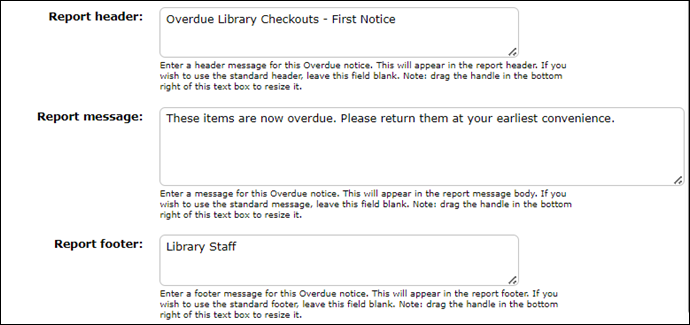
Report Header | Overdue Library Checkouts – First Notice | Overdue Library Checkouts – Second Notice | Overdue Library Checkouts – Final Notice |
Report Message | These items are now overdue. Please return them at your earliest convenience. | These items are now two weeks overdue. Please return them immediately. | These items are now three weeks overdue. If not returned immediately your library borrowing privileges will be suspended. |
Report Footer | Library Staff | Library Staff | Library Staff |
- Navigate to Circulation > Overdues and click the
 button to Create a new overdue.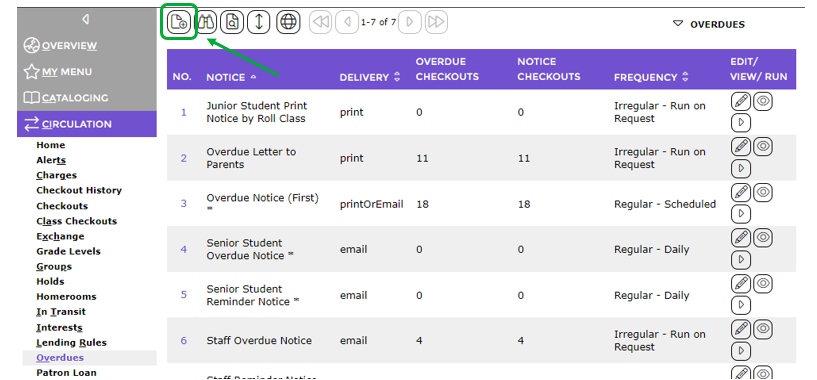
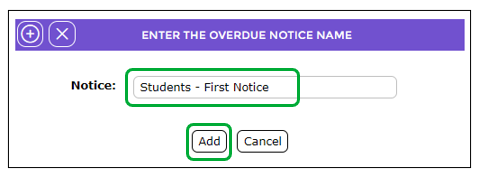
- Enter a Name for the Notice then click either Add button
 or
or  .
. 
- The OVERDUE DETAILS entry screen will be displayed. Enter suitable values for Days Due Back (from) and Days Due Back (To), for example, 7 and 13.
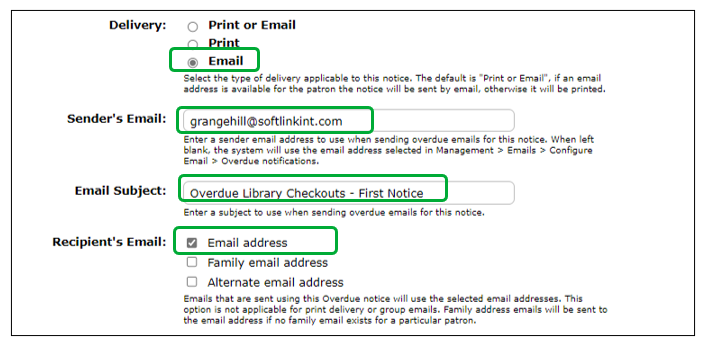
- Select Delivery: Email and fill out the other three email fields as shown below.
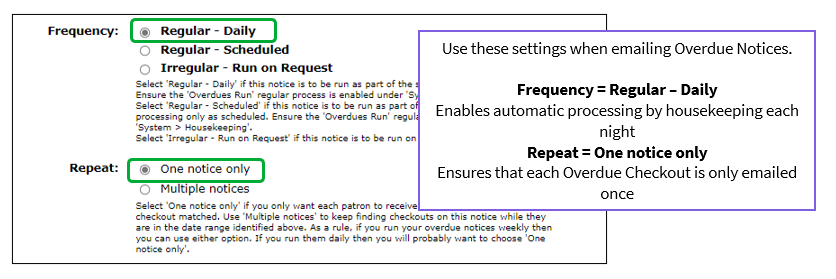
- Fill out the fields Regular and Repeat as shown below.
- Frequency = Regular - Daily: Enables automatic processing of the Overdue Notice Template by Housekeeping each night
- Repeat = One Notice Only: Ensures that each Overdue Checkout is only emailed once. If Multiple Notices is selected, the Patron will be sent an email about the checkout being Overdue every single night.
 6. Select a suitable Email form, for example, First notice email.

7. Enter suitable text for the Report Header and Report Footer. If these are blank, the default text will be displayed. Enter suitable text for the Report Message. This will be printed above the list of overdue checkouts.
8. Click the Save Button  when all required fields have been completed. The OVERDUE DETAILS summary screen for the Overdue Notice Template will be displayed. Click the Edit link for Patron Selection.
 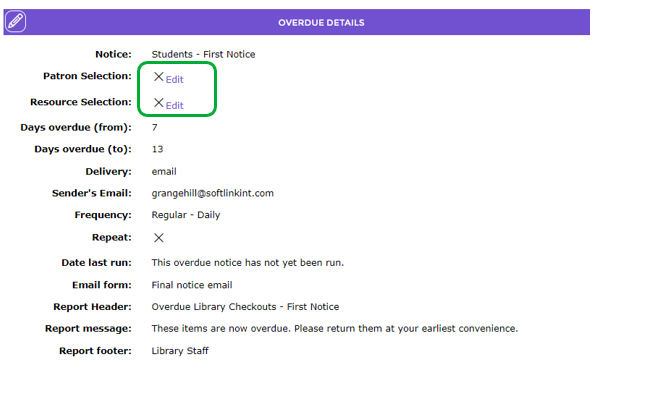 9. The PATRON SELECTION screen will be displayed. Choose a suitable Patron selection and click the Save button.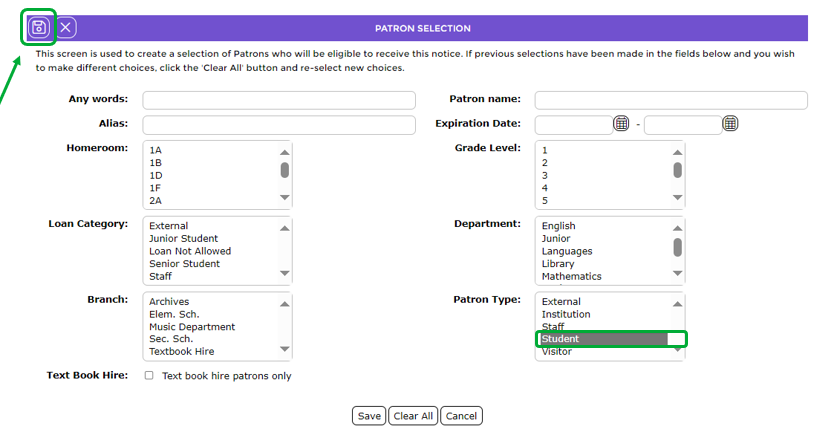
Note: You can choose selections from more than one field and these will be combined with a Boolean ‘AND’. Some combinations may be mutually exclusive, for example, Patron Type = ‘Student’ AND Checkout Category = ‘Staff’.
Note: You can also enter a Search expression in the Any words field, for example, Year=”1”.
10. Patron Selection now displays as a Check to indicate that patron selections have been applied to this q Overdue Notice Template.
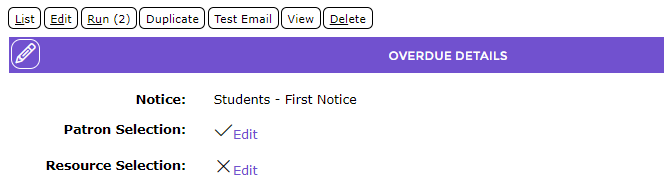
11. Repeat these steps to create Templates for the Second Notice and Final Notice.
Enable Overdues Run in Housekeeping
To enable the Regular emails to be sent out automatically each night, make this change if required.
- Enable the Housekeeping process Overdues Run. To do this:
- Navigate to System > Housekeeping;
- Click the Edit button
 or
or  ;
; - Ensure the Overdues Run option is ticked;

- Click the Save button
 .
.
Troubleshooting Automatic emailing of Overdue Notices.
- # of Checkouts column is 0 even though there are Overdue Checkouts to report. Most likely the One Notice only
Repeat has been ‘used up’ during testing. While testing the setup of an Overdue Notice Template, leave Repeat as Multiple until all testing has been completed. When you Run a Template set to Repeat One Notice Only any Overdue Checkouts that are reported will never again be reported by that Template. This behavior can be confusing when first encountered.
- Emails are not received by patrons. Firstly, check that the emails have been sent. Navigate to Management > Emails > Browse. All emails sent by MackinVision will be listed.
If the Overdue emails are not listed, check the Overdues Run Housekeeping setting has been ticked and that Regular is set to Yes in the Overdue Notice Template. If the field Log shows ‘This email was sent successfully’, then the email has been sent by MackinVision v5. Ask the patron to check if the email has been caught by spam filtering. If the field Log shows that the email was NOT sent successfully, double check the email settings.
Was this article helpful?
That’s Great!
Thank you for your feedback
Sorry! We couldn't be helpful
Thank you for your feedback
Feedback sent
We appreciate your effort and will try to fix the article