Summary
The Copy Details screen contains information specific to copy records. It also includes a number of icons and function options relevant only to copies. There are a number of generic function icons common to many screens throughout the system.
Separate guides provide the steps required to perform functions completed via copy records. A guide identifying and describing common Function icons is also available.
The Copy Details Screen
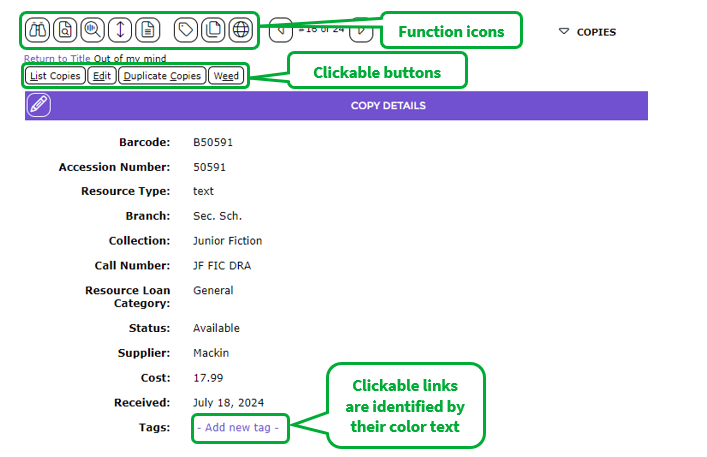
Copies can be access via Cataloging > Copies or via the Detail screen of the resource to which they are tied. Copy Details screens include navigational button, icons and links.
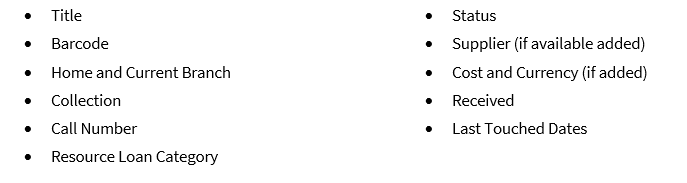
Information on the screen includes:
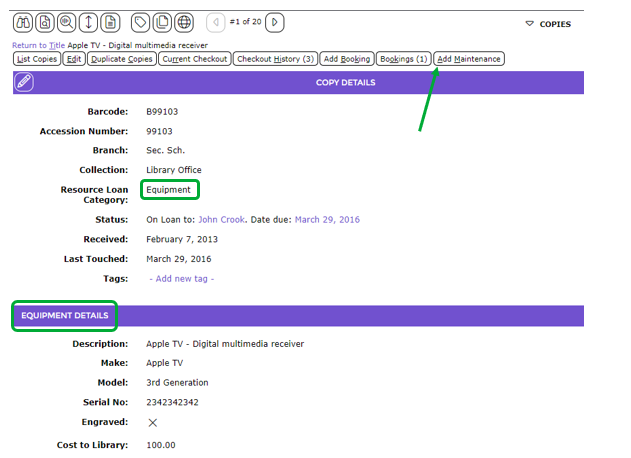
If the copy is for a piece of equipment, it will contain an Equipment Details (and Maintenance) section and related function buttons:
Function icons on any Copy Details screen are those commonly found on the Details screen of most record types, for example, Resources, Patrons and Orders.

A separate guide provides information on icons common to most screens throughout the system.
Function or Access to Information Buttons
The following table identifies and provides a brief description of the buttons on a Copy Details screen:
Option/Button |
Description |
List Copies
| Clicking this button returns the User to the Copies List screen. |
Edit
| Clicking this button enables you to edit copy details. Logged in Users with applicable permission can then edit any details if required.
|
Duplicate Copies
| Clicking this button provides access to the duplicate function. If adding one or more copies, the duplicate process is a quick and efficient way to do so. Users just scan or manually add a unique barcode for each of the duplicate copies and “create’ the copies.
|
Checkout History
| This button will contain a number in brackets indicating how many times the copy has been on checkout. Clicking this link button provides access to the Checkout History List screen. Information on this screen which includes:
|
Current Reservations | This button will contain a number in brackets indicating how may Holds and Reservations there are. Clicking on the link button provides access to:
|
Weed
| This button takes staff to the Confirm Weed screen. The screen includes the title, ISBN/ISSN and Barcode details. The weed process can be completed or canceled as applicable. |





Function Menu Options
The Function menu includes access points to processes available to users with applicable permission. Any options not available to the logged in patron will be grayed out.
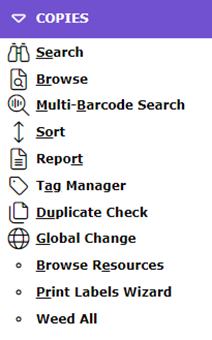
The following table identifies and provides a brief description of the menu options:
Menu Option |
Description |
Search | Clicking on this option takes the staff member back to the Search screen. This is an option common to the Details screen of all record types.
|
Browse | Clicking on this option takes the staff member to the copies List screen. The screen contains the copies returned from a search conducted by the User prior to accessing the copy Detail screen. This is an option common to Detail screens of all record types.
|
Multi-Barcode Search | Clicking on this option will take the staff member to the Multi-Barcode Search screen. Users can scan the barcodes of specific copies (up to the number set on Parameter No. 1200 Maximum List Size) to produce a list of applicable copies.
|
Sort | Clicking on this option will display a Sort screen. This is an option common to Details screens of all record types.
It is useful for List screens. If a Sort type is selected the copies in the List screen will display in that sort order.
|
Report | Clicking on this option takes the staff to the Reports screen. This is an option common to Details screens of all record types.
It is useful for List screens. The selected report will include all copies in the List screen accessed prior to accessing the copy Detail screen not just the currently viewed copy.
|
Tag Manager | Clicking on this option takes the staff member to the Tag Manager screen. This is an option common to Details screens of all record types and enables Users to search for records with a specific tag.
|
Duplicate Check | Clicking on this option takes the staff member to the Duplicate Check screen. This is an option common to Details screens of all record types and enables staff to search for duplicate records.
Users can choose different record types, for example, Patron or resources, on which to search for duplicates.
|
Global Change | Clicking on this option takes the staff member to the Global Change screen. This is an option common to Details screens of all record types.
A global change is run on all copies in the List screen. Changes to a single copy can be done via the copy’s Edit screen.
|
Browse Resources | Clicking on this option will take the staff member to the Resource List screen. A Browse Copies option is available in the Resource Details (or List and Search screens) which will return the User to the Copies List screen.
|
Print Labels Wizard | Clicking on this link will display the Wizard screen. Copy barcodes requiring spine labels are scanned into this screen and then printed.
|
Weed All | Clicking this option will take the staff member to the Weeding screen. It will contain a list of all copies in the copies List screen.
Each copy will have a check in their corresponding Delete checkbox. A Cancel button is available if staff do not wish to proceed with the weed process.
|
Links in the Copy Details Screen
There are a number of links that, when clicked, provide access to related screens or enable staff to complete tasks, for example, create adding or removing tags. Access to screens and functions is dependent on a staff member’s User Role.
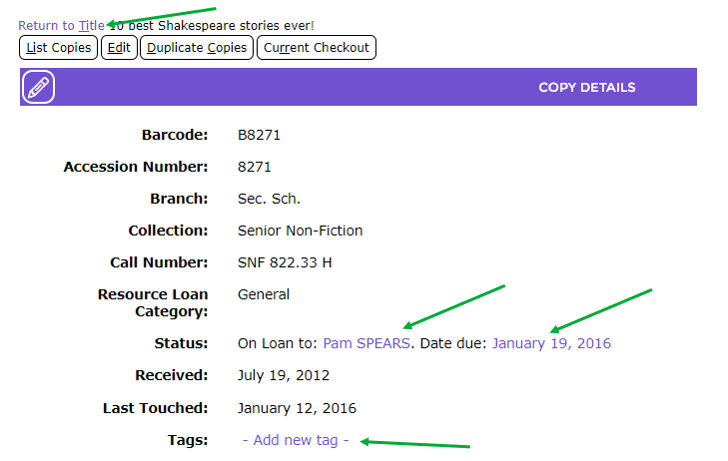
Access is available to:
- The resource record via the Return to Title link
- If the copy is checked out, the name of the patron to whom the resource is loaned displays as a link in the Status field. Clicking the link will take the staff member to the patron record.
- If the copy is checked out, the due date displays as a link in the Status field. Clicking the link will take the staff member to the checkout list screen.
- The Add new tag link enables staff to add a new or existing tag to the copy. It is available whether tags already exist on the record or not. Clicking on any existing tags is the way to delete it from the record.
Was this article helpful?
That’s Great!
Thank you for your feedback
Sorry! We couldn't be helpful
Thank you for your feedback
Feedback sent
We appreciate your effort and will try to fix the article