Summary
Resource records can be weeded with or without copy records attached. In case of those resource records with copies attached, the copies can be weed at the same time if all the copies have a status of Available. Resource records can be weeded individually or in bulk.
This guide will provide the steps required to weed a single resource without copies attached. Separate guides provides the steps required to complete a search, weed a resource with copies attached, weed resource records in bulk, weed a copy and weed copies in bulk.
Weeding Parameters
There are three parameters related to weeding:
Parameter No.2001 Resource Weeding Batch Limit – this parameter determines the maximum number of resource records that can be weeded at a time. The default setting is 50 but this can be changed.

Parameter No.2103 Weeding Reason is Mandatory – this parameter determines whether it is a mandatory requirement that a reason for the weed process be entered as part of the process. If a reason is required Yes should be selected on this parameter.

Parameter No.2107 Item Weeding Batch Limit – This parameter determines the maximum number of copies that can be weeded at a time. The default setting is 1000 but this can be changed.

Weed a Single Resource Record Without Attached Copies
1. Navigate to Cataloging > Resources and complete a search for the required record.
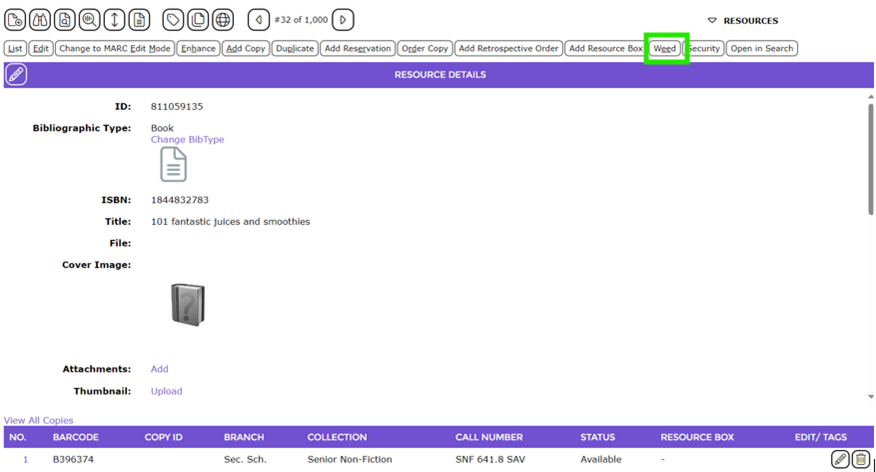
2. Click on the Weed button located at the top of the record.
- If the wrong Title was selected, click on the title link to return to the resource’s Detail screen, click on the Search button and complete a search for the correct record.
- If the record selected is correct, click the Confirm button.
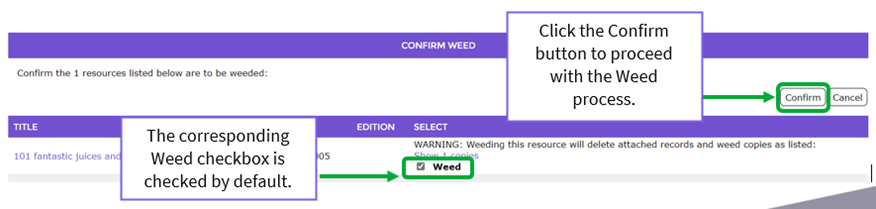
4. The Weeding screen will refresh and note that the resource is now weeded.

5. Click on the Return to list link and the List screen will display.
Was this article helpful?
That’s Great!
Thank you for your feedback
Sorry! We couldn't be helpful
Thank you for your feedback
Feedback sent
We appreciate your effort and will try to fix the article