This guide explains how to create and enable an email patron template that allows librarians to send personalized emails to patrons by automatically pulling information from patron records.
Overview
This feature allows librarians to notify patrons, with an email address on their record, in bulk or individually regarding a specific issue. This functionality allows for the automatic population of specified data from the patron/s record/s for each email sent using the “mask” and, if applicable, text included on the template.
How to Create an Email Patron Template
- Navigate to System > Email Templates
- Click on the New icon or click on New from the Function menu (or type ne).
- The Template > Add screen will display.
- Enter the name of the template, for example Visiting Lecture Program in the Template field.
- Enter the required heading in the Email Subject field. It can be the same as the template name if applicable.
- Click in the checkbox next to Enabled to display a check. This ensures the template is available for selection from the Email and Bulk Email screens.
The template field includes several buttons. The buttons enable librarians to create a “mask” of fields, available on a patron record. The mask text is replaced automatically with the corresponding patron details on generation of the email.
- Click on the first of the mask buttons you want to include on the email, for example First Name. To ensure the patron name displays in the format of first name and surname on the same line - John<space>Smith for example, hit the space bar on your keyboard then click on Last Name then click the Enter key on your keyboard.
- Click on the next mask button representing the information you want to include on the email, for example Alias, then click the Enter key on your keyboard.
- Repeat the step for all the mask keys required.
- When all the keys required have been added, hit the Enter key on your keyboard then add the text appropriate to template. Entering text is not mandatory.
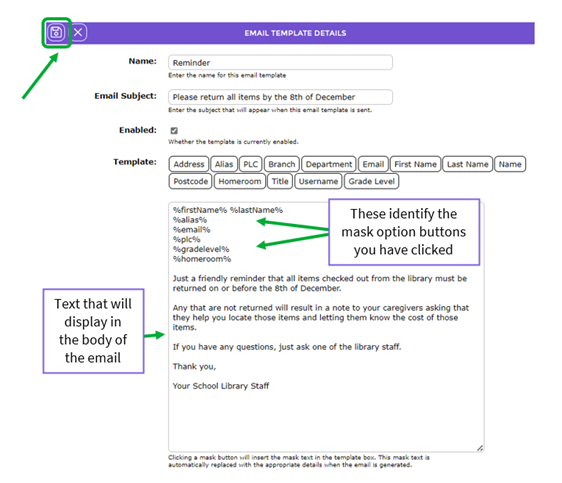
- Click the Save icon when all details have been completed. Note that you can access the template and edit the text as required.
- The template’s Detail screen will display
Was this article helpful?
That’s Great!
Thank you for your feedback
Sorry! We couldn't be helpful
Thank you for your feedback
Feedback sent
We appreciate your effort and will try to fix the article