This guide explains how to create a MARC template from scratch by adding the required MARC tags and subfields, providing a structured template for staff when cataloging new resources.
Overview
A template for a basic or very complete MARC record can be created, including as many or few MARC tags and associated subfields as required. Entering sample text in provided fields to guide staff to add the applicable data in the tags is recommended. The example steps will show you how to create a basic MARC template, but additional tags and subfields can be added as required using the steps provided below.
How to Create a MARC Template from Scratch
- Navigate to Cataloging > Bibtypes
- Click on the number link corresponding to the BibType for which a MARC template is to be created.
- In the BibType’s Detail screen click on the Create link in the Resource Template field.
- If MARC is the default mode for cataloging in your system, the MARC Editor screen will display.
Note: If MARC is not the default cataloging mode the resource Detail screen will display. Access the MARC Editor screen by clicking on the Edit button ensuring that the button to its right is labeled Change to Non-MARC Edit Mode.
- The LDR is included by default in an otherwise blank editor screen. You can now start adding tags and subfields that will then be completed when cataloging a resource. Note that at the very least, the 245 $a tag field must be completed as a title is a mandatory requirement.
- Click on the Add button at the bottom of the Editor screen and the Add Tag popup screen will display.
- The first tag available, for example 001, Control # will display by default in the popup screen.
- To add the tag to the template, click on the OK button at the end of the field in the popup screen. The 001 tag is automatically inserted into the correct numerical position in the Editor screen.
- Click in the field and add default explanatory text at this point, for example, “Enter control number here”
- lick on the Add button again to display the Add Tag popup screen
- The next tag in numerical order will automatically display in the tag field in the popup screen.
- To add the tag to the template, click the OK button. The tag is automatically inserted into the correct numerical order. Again, click in the field and enter some explanatory text
There will be a number of tags and applicable sub-fields you will want to add. Remember, at the very least, the 245 tag and ‘a’ subfield must be added and completed on the template. To add a tag and related sub-fields complete the following steps:
- Click on the Add button to display the Add Tag popup screen
- If the tag highlighted is not required, click on the down arrow at the end of the Tag field. Part of the available list of tags will display. (Picture below)
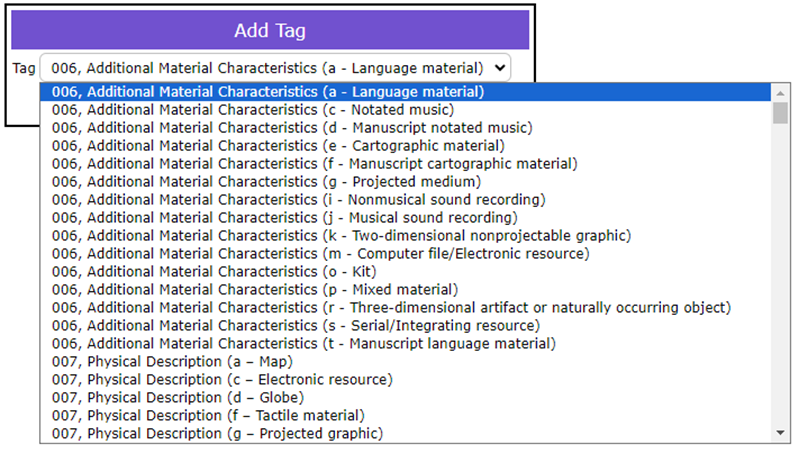
- Scroll down to locate the tag required
- Click on the tag number then the OK button
- It will automatically display in the correct numerical position in the Editor screen.
- Once all the wanted tags are added, click the Save button

Note: For tags where the subfield ‘a’ is mandatory, that subfield is automatically included when the MARC tag is added.
TIP:
If a tag is entered out of numerical order sequence you can use the Up or Down arrows at the end of the applicable tag section.

Click the arrow until the tag and subfield section is positioned correctly. In the example provided, the Up arrow only needed to be clicked once.

Was this article helpful?
That’s Great!
Thank you for your feedback
Sorry! We couldn't be helpful
Thank you for your feedback
Feedback sent
We appreciate your effort and will try to fix the article