Summary
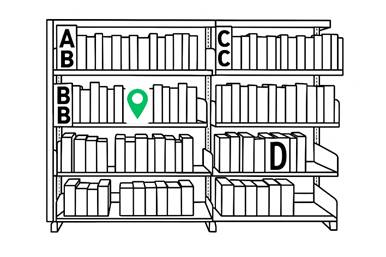
This guide provides steps to create a map and add location markers. The Maps functionality allows library staff to upload shelf images or created maps of their library and add location markers that help library users identify item location by Collection and/or Call Number.
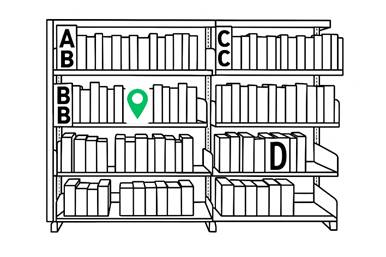
Step 1 – Preparation
- Parameter 4402 'Enable Library Maps', should be set to 'Yes' to enable the map marker functions. You can set this by navigating to Management >Parameters and searching for 4402 to edit.
- Parameter 4537 'Map Marker Icon' allows you to select which icon will be used: Drop pin, Map pin or Spot. Adjust this parameter as required.
- Parameter 4538 'Map Marker Color' allows you to customize the color of the marker icon. Adjust this parameter as required. The RGB hex code of the color can be entered, if required.
- Gather all the digital images you will be using. For the mapping function to work correctly, you will need to add images and location markers for your entire library at one time. These can either be created graphics or digital photos of library shelves. Sizing Note – smaller images work better (e.g. 950 x 700 pixels or smaller) so you may need to resize your images accordingly before importing.
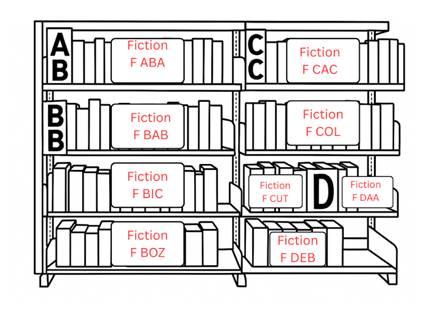
- Plan Your Location Markers –For each shelf / area in your images, decide the starting Call number and Collection name (if applicable) to assign that matches your physical space. Some considerations:
- At least one marker should be used per shelf.
- The marker for each shelf must designate the beginning of that shelf’s call number or the lowest call number in that shelf’s range. The next shelf’s marker starts a new range, automatically designating the end of the call number range for the previous shelf.
- The more markers that are used, the more accurate the map will be
- You can use more than one marker on each shelf, ordering them and spacing them accordingly.
Step 2 --Adding a Map
- Navigate to Management > Maps, and click the New/'Upload a New Library Map' icon or select New from the Maps menu.
- On the Library Map Details page displayed, enter a Map Name, select a Branch, and choose the corresponding map image to upload.
- When you press the Save icon in the colored header at the top, the Library Map Details page will populate with your uploaded image.
- Repeat these steps, adding all the images for the library spaces.
Step 3 --Adding Markers to a Map
- Navigate to Management > Maps to open the list of Maps you have created.
- Press the numbered link next to the map to enter the Library Map Details page.
- At the top of the page, press the Edit button or icon, activating the location marker labeling function.
- On the map image, click on the shelf location where you want the marker to appear.
- On the Add Coordinate screen that displays, select Collection (if applicable) and enter the designated Call Bumber for that shelf location (e.g. Collection – Fiction and Call Number - F ABE). Note, if your Call number is a number, you do not need to enter the numbers behind the decimal point, as the minimum call number applies.
- When you click the Mark button to save, a colored location marker will appear on the image where you originally pressed.
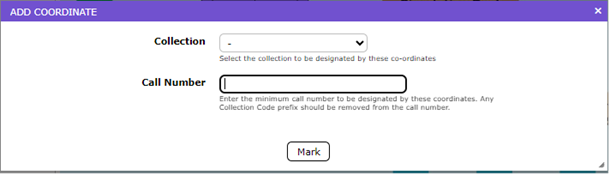
- Repeat this process, adding additional markers to the remaining shelves in the Map image, pressing the Save button at the top left upon completion.
Note: By editing the Library Map Details, you can click the location markers you have created to edit corresponding information or to delete.
Step 3 -- Confirm Map Appearance in the Search Interface
- Navigate to the Search Interface and run a search for a title.
- Click on the Title or cover image to access the Detail screen.
- Find the Where Is It? section, and press the See All Copies Link
- On the All Copies and Locations tab, click the Map Show icon.
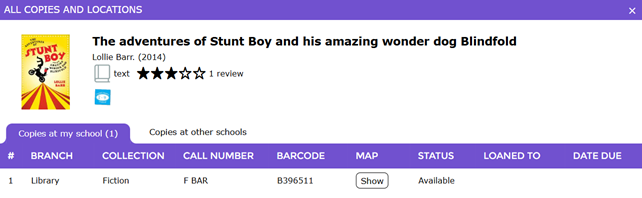
- The map will display with the marker flashing in the applicable shelf and shelf location to identify where items with that call number can be found.
Tips and Troubleshooting
- If you re-arrange the shelving or layout of the library, you will need to adjust your library maps to reflect the new position of the library material.
- Housekeeping Process -- If you notice after time that your Map location markers are not populating correctly or the parameter 2033 'Support Library of Congress call number sorting' parameter is changed (this should only be set to 'Yes' if your library uses Library of Congress call numbers), you can run the housekeeping process 'Update Map Coordinate Derived Fields' found in System >Housekeeping.

Was this article helpful?
That’s Great!
Thank you for your feedback
Sorry! We couldn't be helpful
Thank you for your feedback
Feedback sent
We appreciate your effort and will try to fix the article