Summary
Library staff can add resource (non-MARC) records to the catalog. Resource records, added by completing the fields provided in the Resource Details screen, will not create a corresponding MARC record.
This guide will provide the steps required to create (manually add) a non-MARC record. Separate guides provide the steps required to import MARC records and create or edit MARC records.
Related Parameter
Parameter No. 6003 - MARC Cataloging is the Default. If adding non-MARC records is the usual practice choose No. This will ensure the checkbox next to MARC21 in the Add a new Resource popup screen is blank by default.
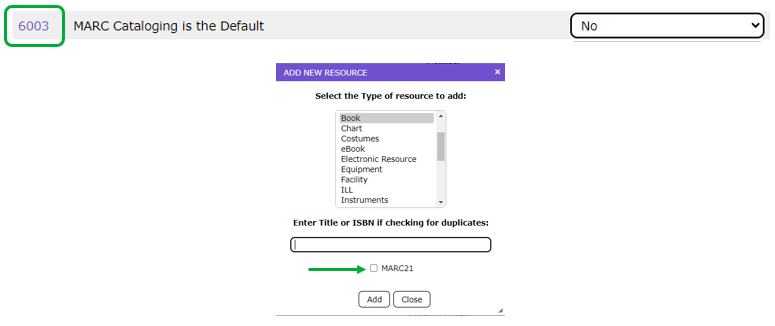
Note: If most resources added to the catalog are MARC, ensure Yes is selected on Parameter No. 6003 and just click in the checkbox to remove the check if adding a non-MARC resource.
Manually Add a Resource Record
While importing a MARC record will create a corresponding resource record, adding a resource record by manually completing the fields in the Resource Details screen will not create a corresponding MARC record.
1. Complete a search to check whether a record already exists before adding a new record.
2. If the title does not exist, click the New icon or select New from the Resources menu or type ne.
3. The Add New Resource pop-up screen will display.
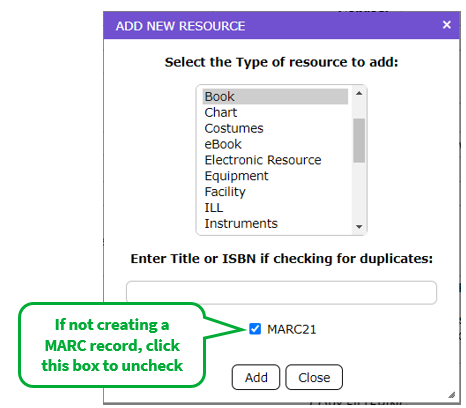
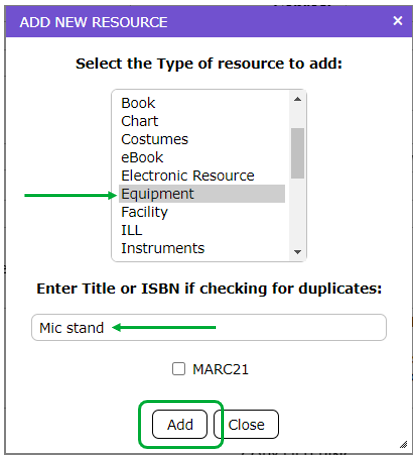
4. If the highlighted BibType does not apply to the resource being added, click on the applicable type from the list provided.
5. If there is a check in the MARC21 checkbox click in the checkbox to remove the check. If the check remains, the MARC editor screen will display for staff to create a MARC record that automatically creates a resource record.
6. Enter the title of the resource in the Enter Title… field then click the Add button.
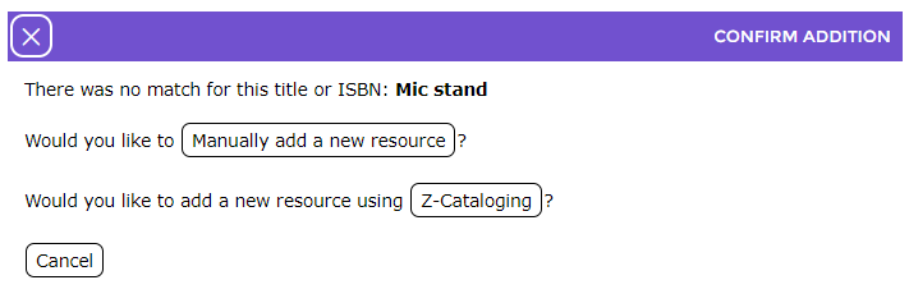
7. In the Confirm Addition screen click on the Manually add a new resource button.
8. On the next screen, complete all the fields you require. Note that the ID number is the automatically generated and the title you entered in the previous screen displays in the Title field.
Note: If you do not enter a title in the Add a New Resource popup screen field, the Resource Add screen will display straight after clicking the Add button.
While only the Title field is mandatory when creating a non-MARC resource record, it is recommended to fill in as many fields as appropriate for the level of cataloging that is required for your library. The following table provides the field names available in the Resource screen and a description:
Field |
Description |
ID | An automatically generated system number will display in this field. |
ISBN | Enter the ISBN of the title in this field. The ISBN is located in the book, generally on the page containing the publication details or as a scannable barcode, with readable text, on the back cover. |
Additional ISBNs | Enter any other ISBNs that may apply for this resource. For example, the current resource may be in hardcover format however, the title is available also in a paperback format that will have a different ISBN. Note: If a title has a different ISBN, it is advisable to create a separate resource record. |
Title | Enter the title of the resource in this field. Note: If a title was entered in the field available in the Add a New Resource popup screen, it will automatically display in this field. |
Statement of Responsibility | In the case of a book, for example, there may be information about the authorship for example relating to an editor or photographer or translator and should be transcribed exactly as it appears on the item. |
Other Title | Enter any alternate title. |
Resource Type | Clicking the down arrow at the end of this field displays all Resource Types available for selection in the system. |
Format | If the library’s registration includes STAR, the junior catalog search feature, a list of created Formats will display by clicking the down arrow at the end of this field. Formats are used to group resources by their physical or content type. Example formats could be Picture books (Picture), Fiction books (Story), Toys, and Games (Toys) and so on. |
Related URLs | If there is an associated URL enter it this field. The URL should begin with any of the formats listed in the Help under this field, e.g. https:// |
Author | You can enter, or search for, the author of the resource in this field if applicable. This field includes predictive searching. At the end of the field there are three checkboxes. If used, these fields will determine how the search is performed. See the section on Publisher for an explanation of the functions included in an authority field.
|
Edition | Enter the Edition in this field, for example, 3rd ed. |
Place | Enter, in this field, the place of publication of the resource for example, London. |
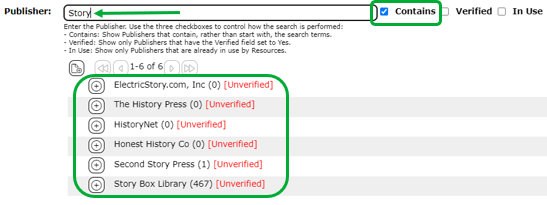
Publisher | You can enter, or search for the Publisher in this field. This field includes predictive searching which enables you to search to check if the Publisher already exists as an authority term in your system.
At the end of the field there are three checkboxes which if used will determine how the search is performed:
Contains – if only part of the publisher name is entered and you click in this check box only terms currently existing in your Publisher Authority Files which include the string will display, for example:
Verified – if you only wish to display only verified, authority terms existing in your database, click in this checkbox.
In Use - if you clicked in this checkbox only publishers that are already used, that is, included on other resources records in the system, that begin with the entered search term will display. In the previous screen example, all the terms would display as they are included in the authority file. A number, in brackets identifies the number of records that include the term.
Note: It is not mandatory to click in any of the checkboxes.
If the Publisher does not exist, you can just click on the New icon to create the term entered in the Publisher field as a new authority term.
|
Publication Date | Enter the date of the publication. Usually this is just the year, for example, 2011. |
Description | Enter the physical description of the resource, for example, its dimensions, the number of pages, whether there are illustrations and so on. |
Series | This field is used for resources that are part of a series, for example, the Mitford series. The field includes predictive searching. At the end of the field there are three checkboxes used to determine the search performed. It operates in the same manner as described for the Publisher field. Additionally, Series Part information can be added to each Series. |
Notes | Any additional notes for the resource are entered in this text box. Rich text formatting is available so staff can change the font size, style, format, and color of the text in this box. |
Subjects | Enter the subject or subjects in this field. This field includes predictive searching. At the end of the field there are three checkboxes which can determine the search performed. It operates in the same way described for the Publisher field. |
Genres | Enter the genre(s) in this field. This field includes predictive searching. At the end of the field there are three checkboxes to determine the search performed. It operates in the same manner described for the Publisher field. |
Lists | Also known as Reading Lists. Select either Lists from an authority file or Lists created by the staff. This field includes predictive searching. At the end of the field there are three checkboxes to determine the search performed. It operates in the same manner as described for the Publisher field. |
Call Number | Enter the call number for this resource. |
Control Number | The Control number entered in this field, is the one specified by the import record supplier. If creating a bibliographic record manually there is no applicable number. |
System Control Number | The number entered in this field is the Library of Congress alternative control number assigned to a MARC record. If you are creating a bibliographic record manually there is no applicable number. |
LCCN | The number entered in this field is the Library of Congress control number assigned to a MARC record. If creating a bibliographic record manually there is no applicable number. |
Summary | A brief descriptive text about the resource being created is entered in this field. |
Contents Page URL | If applicable, enter the URL for the contents page of the title. |
Temporary Checkout Resource | If this resource is to be the one to which all temporary checkouts are to be assigned, click on the radio button next to Yes. By default, the No radio button is activated. |
Cataloging Authority | The code entered here would be for the agency whose system control number is contained in the control number field. |
Country | Click the down arrow at the end of this field and select the applicable country from the list that displays. |
Optional Fields | Description |
Catalog Source | This field can be added via the Page edit function if it does not already exist on the resource Add/Edit screens. Enter the cataloging source for the resource in this field. |
Reference | This field can be added via the Page edit function if it does not already exist on the resource Add/Edit screens. Enter source reference information. |
Source | This field can be added via the Page edit function if it does not already exist on the resource Add/Edit screens. If the record is part of a larger work, enter the Title of the parent record |
User Defined fields | If any user defined fields are added to the screen (via Page edit) complete them as required. The fields should be labeled via Translations, to identify what information is to be entered.
|
9. When all the details have been completed click the Save button.
Further information on Adding Authority Terms in the Add Screen
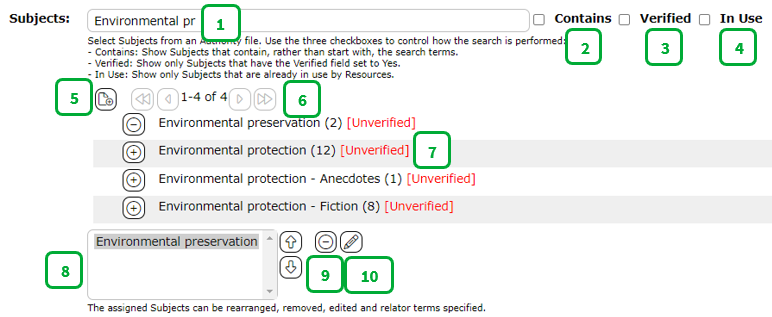
Authority Control terms can be added by entering a part of or all of a term in the corresponding text field. Any existing terms will be displayed in the list box below the field from which the staff member can select. The example process will illustrate adding an existing subject term. The same process applies to adding any term to other authority control term fields.
Function |
Description |
Text field (numbered 1) | Enter part or all of the applicable authority term. Any matching existing terms will be displayed in the list box. If no matching term exists when the full term is entered, staff can add the term by clicking the New icon (see number 5). |
Contains checkbox (numbered 2) | Click in this checkbox to instigate a Contains search. If the checkbox is not clicked in, the system will do a Starts with search on the search term or part term that has been entered.
A list-box will display below the text field identifying any existing terms “starting with” the term or part term entered in the applicable authority text field. |
Verified checkbox (numbered 3) | Click in the Verified checkbox if you prefer the prediction list to return only existing terms that are verified. |
Usage checkbox (numbered 4) | Click in the Usage checkbox if you want the prediction list to include only terms already in use. |
New icon (numbered 5) | If no matching terms exist, click the New icon. |
Previous and Next arrows (numbered 6) | If there are more than a few terms returned use the Back or Forward arrows to move through the returned terms. |
List field (numbered 7) | The list field will display and include any existing terms matching the term or part term entered in the text field (numbered 1).
A list of matching terms will display in the list-box below (numbered 8). Click the little Add (Plus) icon next to any term displayed in the list-box if it is to be added.
Click the Remove icon (numbered 9) next to any term in the list-box to remove it from the list. This icon will display if the term is already tied to resource. |
List field (numbered 8) | Any terms already tied to the resource being edited will display in this list field. Any new authority term added to the resource will subsequently display in this list box as well.
An Up and Down arrow, located to the immediate right of the list-box enable staff to change the order of the selected authorities by highlighting the applicable term and clicking the applicable arrow until the term is placed in the required position in the list. |
Delete icon (numbered 9) | To delete any existing term/s tied to the resource being edited, highlight the applicable term and click this icon. |
Edit icon (numbered 10) | To edit the highlighted authority term in the list-box, for example complete a thesaurus structure, click on the Edit icon, complete the Preferred (see), non-Preferred, Related etc. fields then click the Save button to return to the Add screen. |
TIP: MARC records can be created from non-MARC records by using the MARC Export option to export the records as MARC and then importing that file into the system via the Management > Import function.
Was this article helpful?
That’s Great!
Thank you for your feedback
Sorry! We couldn't be helpful
Thank you for your feedback
Feedback sent
We appreciate your effort and will try to fix the article