Summary
A Resource box is an item (box, hanging bag etc.) with its own barcode, linked to a resource record. Copies are then added into the resource box. The box can be created to hold several copies, each with their own barcodes. The copies can be of the same title or of different titles in one “place”. This guide will provide the steps required to create a resource box to which several existing copies will be added.
Overview
Resource boxes are a useful tool for library staff to group a selection of teaching, project, or subject resources within one physical and easily locatable ‘box’. There is no limit to the number of copies you can add to a Resource Box, as part of the process to create the box. Further copies can be added later, and existing copies removed as required.
Create a Resource Box
- Ensure all resources/copies to be included in the Resource Box are already cataloged.
- Catalog the actual Resource Box (this will be the box, hanging bag, etc.) and give a Resource Type of, for example, Resource box.
- Go to Cataloging > Resources > Search to find the Resource Box record.
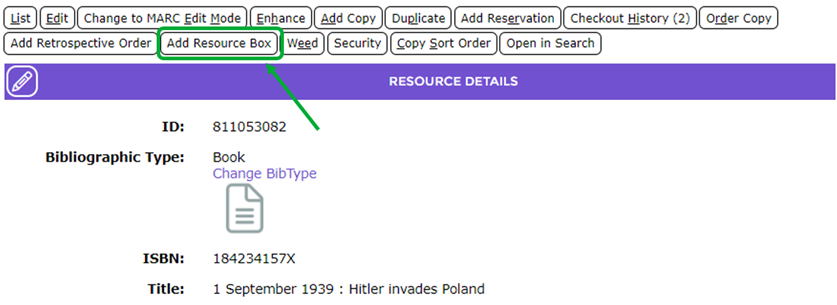
- The Add Resource Box screen will appear.
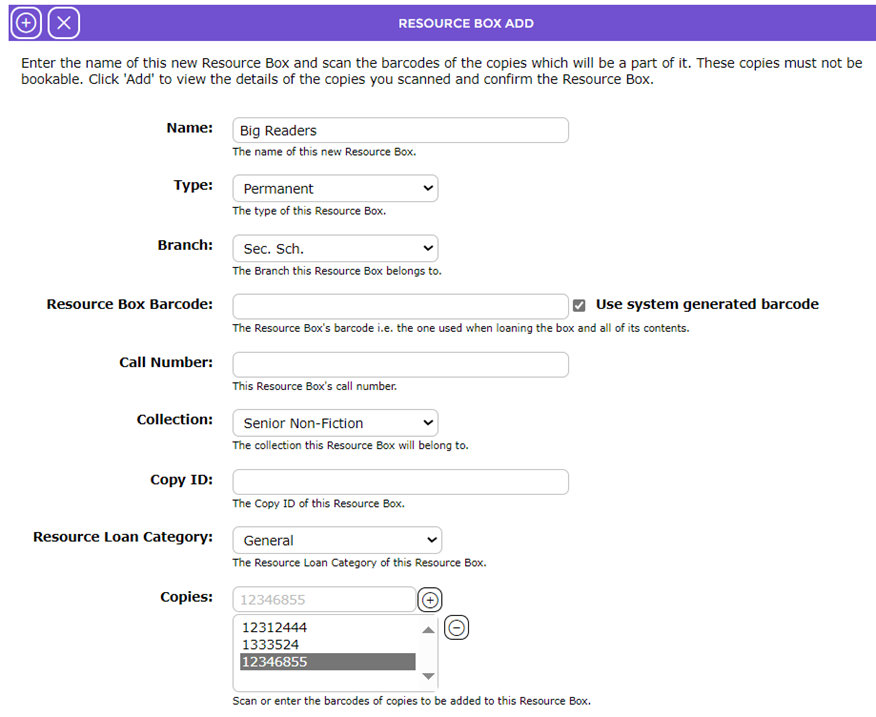
- Add the name of the Resource Box to the Name field. The title of the Resource Box can be the same as the resource Title or it can be unique.
- Choose the Type from Permanent, Temporary or Substitute. It is recommended to use Permanent.
- Choose the Branch from the drop-down list.
- Scan or type (then click enter) the Resource Box allocated barcode.
- Add the barcodes that will be linked to the box in the Copies box.
- When all barcodes are entered click the Add button
 at the top.
 - A screen will display showing the newly created Resource Box.
- Check the copies added to the box are correct then click the Add button. The tickbox shows copies that will be added.
- The screen below will appear, and the user can: add, remove, and weed copies.
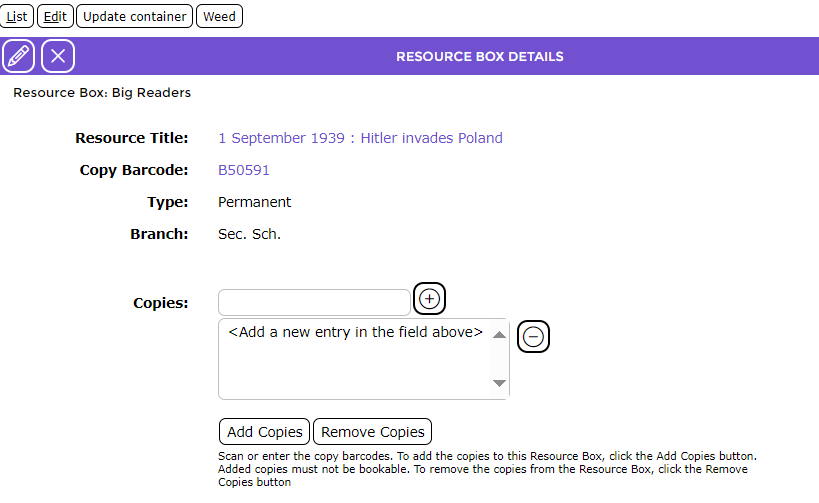
- To add a new copy, scan the barcode(s) of the resource(s) to be added in the Copies Box then click Add Copies.
- To remove copies from the Resource Box, click the Remove? button across from the copy or scan the item barcode(s) into the Copies box and click Remove Copies.
- Items can also be Weeded from this screen using the Weed? Button across from the copy.
- If everything is correct, click the Save button.

Was this article helpful?
That’s Great!
Thank you for your feedback
Sorry! We couldn't be helpful
Thank you for your feedback
Feedback sent
We appreciate your effort and will try to fix the article